Dan Kitwood via Getty Images
In our present digital economy, most (if not all) of our financial transactions rely on centralized intermediaries, whether a corporation or the government. This has led to an alarming rise in economic censorship and surveillance and a corresponding drop in our freedom to transact. But as punk6529 has brilliantly laid out in this thread, all freedoms are downstream of the freedom to transact.
In this guide, we’ll teach you how to create an unstoppable, global, and censorship-resistant digital identity that can preserve your freedom to speak and transact no matter what kind of repressive turn your local government takes.
If you've never taken a single step into the world of crypto and web3, this guide is for you. We’ll start you from absolute zero and walk you through everything you need to do and know in order to take control of your online payments and messaging.
When you're done with this guide, you'll own a cancellation-proof and deplatforming-proof digital identity that you can use for payments, messaging, authorization, and more.
In this guide, you will:
Before the internet, communicating with anyone in the world required two pieces of information: a legal identity and a geographical location (address).
To send a message, you would write its contents on a piece of paper, add the recipient’s identity and address, and physically mail it via the postal service.
To: Jean Hansen
12th ABC Street, Curitiba, Brazil
Message…
But today, with just an internet connection, you can instantly create an email address that’s globally accessible and allows anyone to send messages to you in real time. All that’s required to be part of this global email network is to download a client and set up an account for free. Messaging no longer requires a legal identity, physical address, or paper documents.

As previously explained, the email network can be understood using a simple analogy with physical addresses.
The sender must know the recipient’s identity and address to send a message.
identity@address
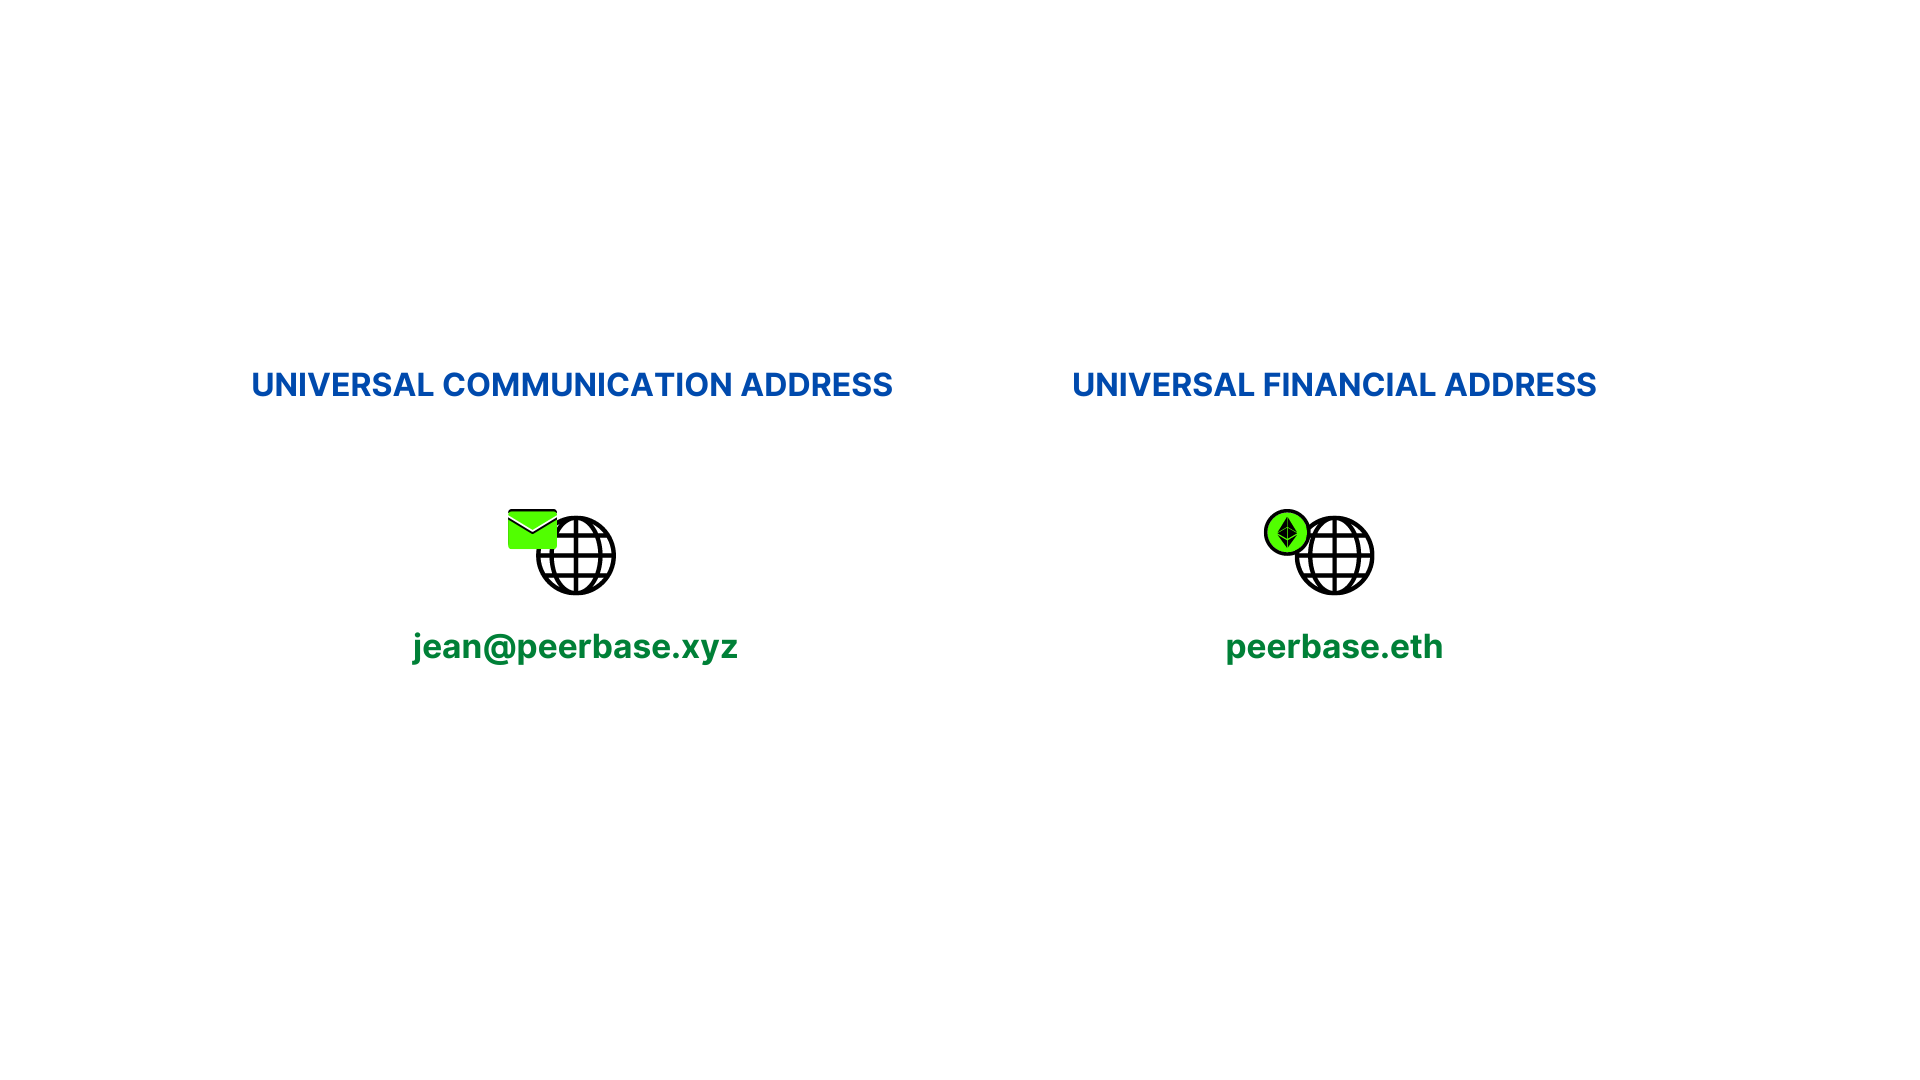
So, roughly speaking, when you send a message to jean@peerbase.xyz, you essentially tell the network to “send the message to the user ‘jean’ at the computer whose address is peerbase.xyz”. That’s it; pretty simple.
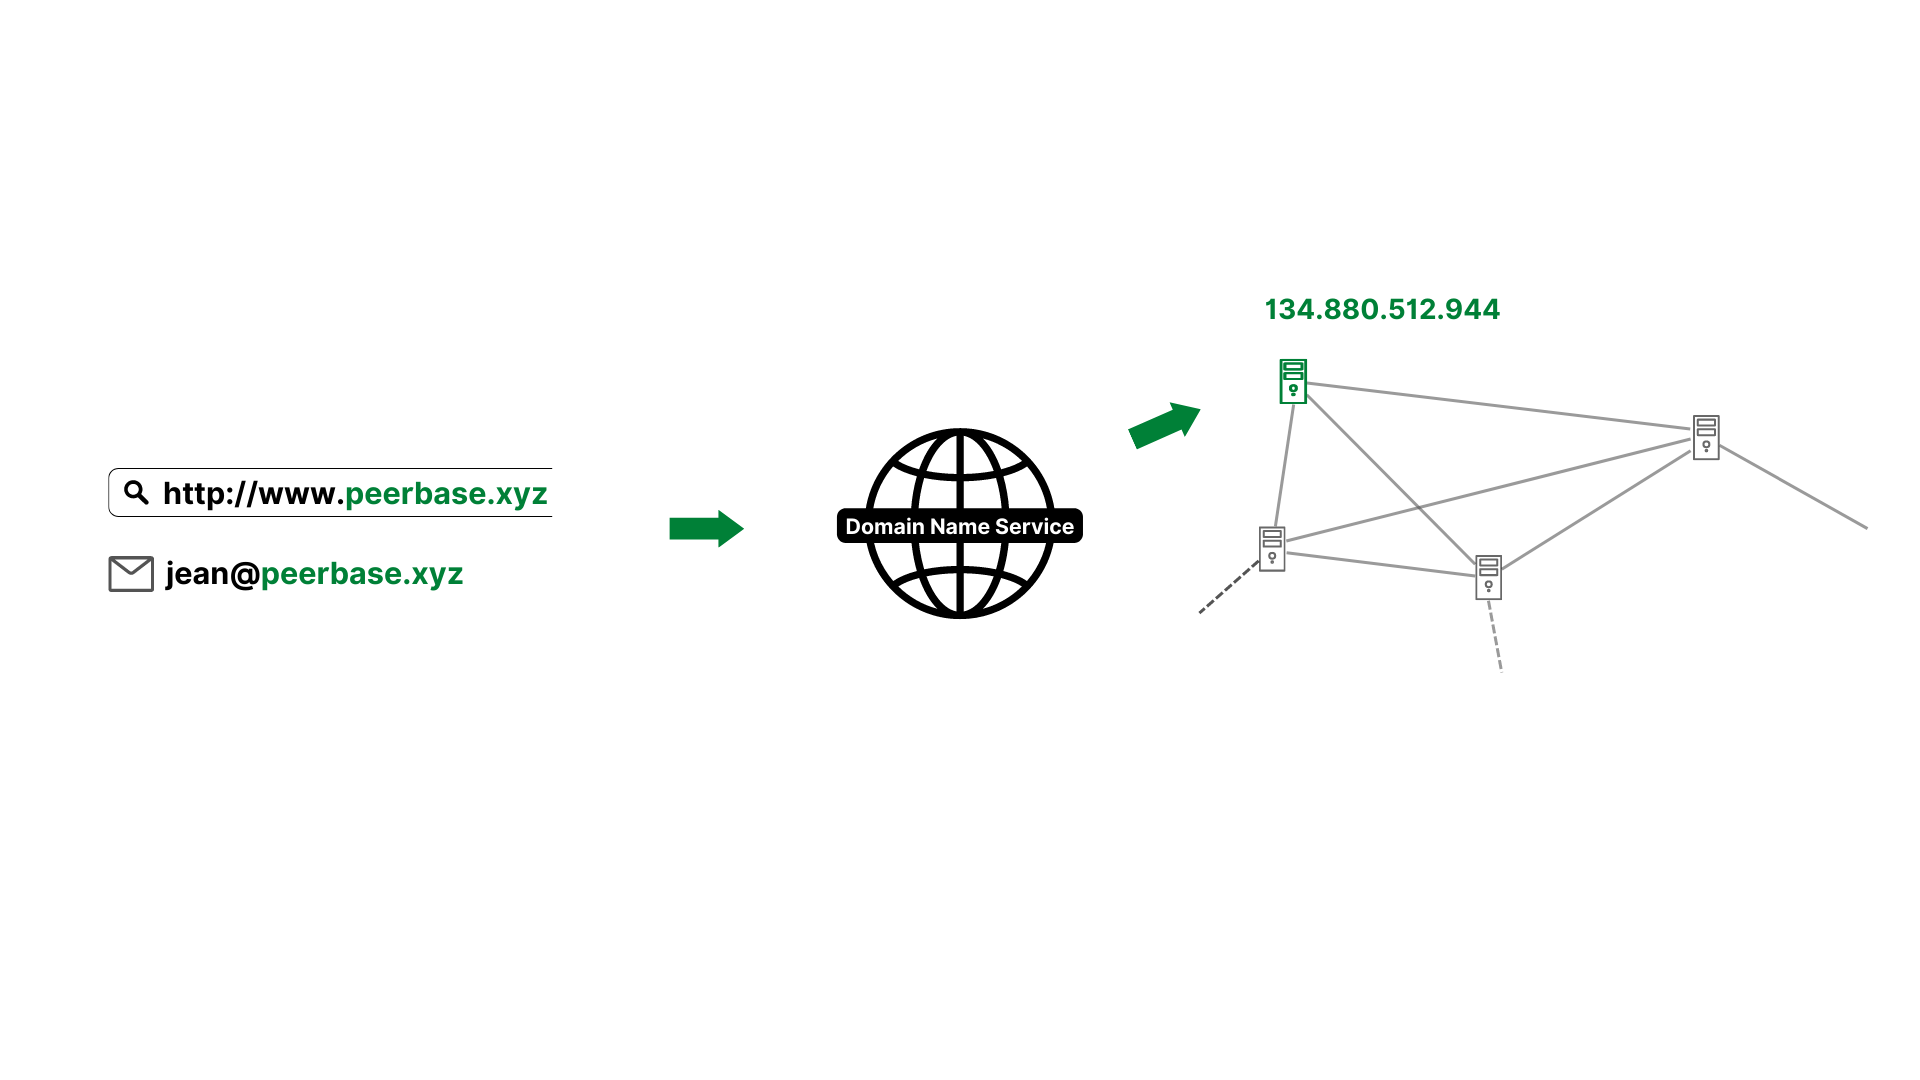
However, under the hood, the actual address part of the email identity consists of a set of numbers known as the IP address. These numbers would be difficult to remember and use regularly. (An example IP address: 325.667.810.877.)
The concept of a domain name was introduced to provide a human-readable, easily memorizable substitute for IP addresses.
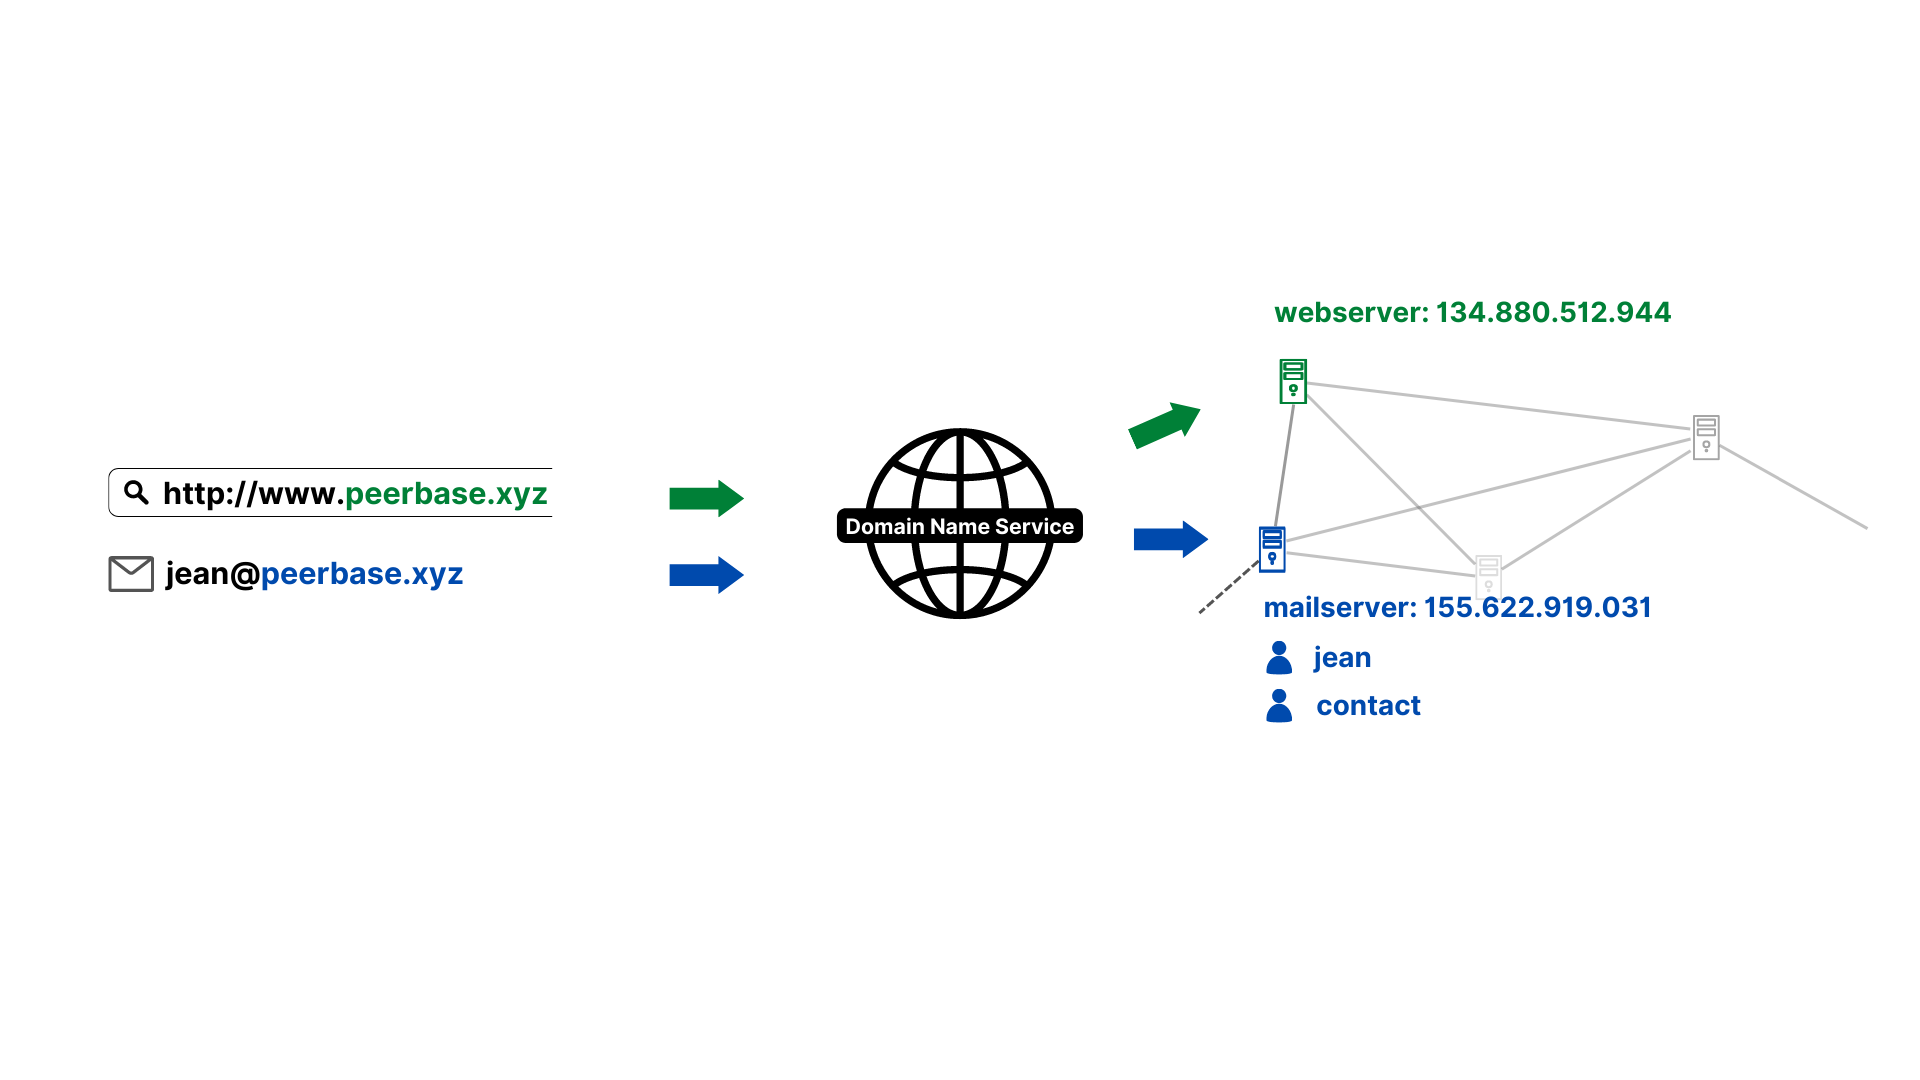
When you buy a domain name (such as peerbase.xyz or return.life), you need to link it to an actual server address using the Domain Name System. The DNS is essentially a centrally managed ledger responsible for transparently translating a domain name to an IP address whenever you send an email or type an URL into a browser.
Currently, most email domains, for convenience, are borrowed from companies such as Google (Gmail) and Microsoft (Outlook). However, people can buy and own their own domain names for more professional and flexible use.
When you own your own domain, you have the freedom to set several entries associated with your domain in the database of a DNS provider. For example, you can set up a web server address (e.g. www.peerbase.xyz) and map it via DNS to the IP address of a computer responsible for delivering your website. You can also use DNS to set up an email server address that delivers your messages and manages a user list.
This is a very powerful combination of technologies. You own an address through which you can communicate with high degrees of openness and freedom with any internet user worldwide for free.
However, until recently, there were two crucial missing pieces in this tech stack.
Several financial start-ups in the early 2000s, such as PayPal and Stripe, tried to solve the payments problem. These services allowed users to wire money globally using an email account. However, users still needed a bank account, a geography-based identity, and a physical address. This was not yet a digital native solution, and still, it perpetuated several previous problems, such as the exclusion of billions of people from the global financial system and massive surveillance.
Nobody had actually come even close to supplying the first missing piece — true ownership of digital goods like addresses. That part would have to wait for the rise of two entirely new monetary digital paradigms — Bitcoin in 2009 and Ethereum in 2015.
If email allows anyone to have a universal communication address, crypto allows anyone to own a universal financial address.
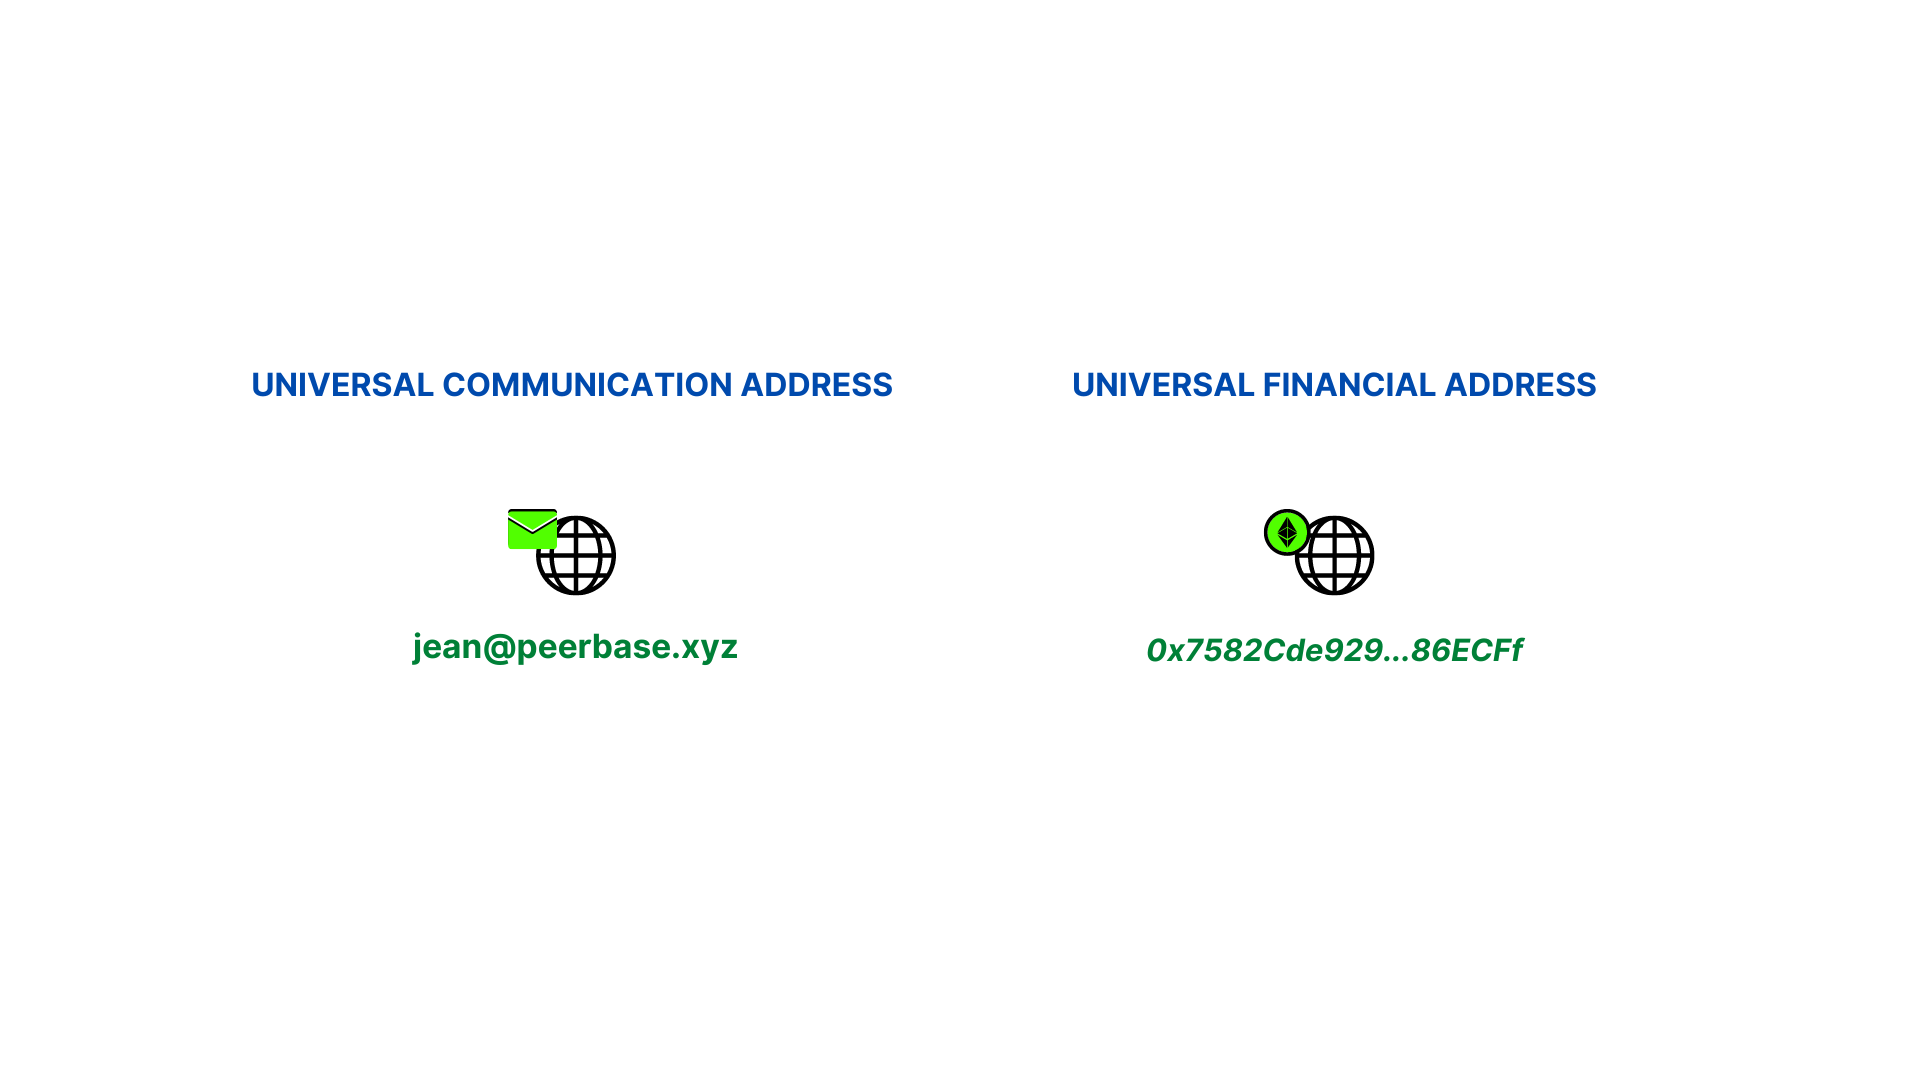
To acquire and use a universal financial address, all you need to do is download a client, which we call a crypto wallet, and you’ll immediately get a free crypto address that can receive and send assets across borders.
This is a massive social and technological revolution. Now, everyone can have a virtual "bank account" and permissionlessly transact with anyone else, regardless of race, gender, nationality, income, or age.
Furthermore, by using web3-native messaging protocols, you can also send and receive regular, non-monetary messages via this address.
The party sending you money or messages doesn’t need to know your nationality, physical address, age, or personal information. Parties can, from anywhere in the world, send valuable assets and encrypted data to your address, and within seconds you’ll receive it in your wallet.
You truly own this crypto address — no government or corporation can take it from you without first stealing your private key. It’s yours forever until you decide to give it up.
Similar to how the Domain Name Service acts as a proxy between a user-friendly domain name and a numerical internet address, crypto has its own answer to DNS called ENS (Ethereum Name Service), which acts as a proxy between a user-friendly name and a crypto address.
your-decentralized-domain.eth ➡️ 0x123456…789
Instead of sending money to a complex string of numbers and letters (comparable to accessing a website by typing an IP Address), you send money to an ENS address.
Despite their similarity, DNS and ENS have some fundamental differences.
DNS relies on a centralized entity (ICANN) with regular databases to store domains. ENS, in contrast, relies on a Decentralized Autonomous Organization for governance and public blockchains for storing the actual records that map ENS names to crypto addresses.
Note: ENS’ decentralized architecture not only provides more censorship resistance — no one can freeze or shut it down — but also enables programmability, seamless secondary sales, a high degree of interoperability between applications, and several other properties inherited from open blockchains.
For example, you can use your crypto account, with or without an ENS, to log in to any decentralized app instead of creating a new login and password for each unique site you want to sign up for.
 Forget about managing hundreds of passwords. Log in to apps with the same credentials.
Are you interested in owning a crypto domain, but it seems overwhelming?
Don’t worry. Even if you have zero experience with crypto, in the rest of this guide, we will teach you the entire process of getting your own ENS address — from creating a Blockchain account and adding funds to it to buying, setting up, and using an ENS address.
ENS is a native service on the Ethereum Blockchain, the world’s largest App Blockchain. ENS works mainly on this ecosystem for now, although several other compatible platforms exist.
To buy and own an ENS domain, the first step is to create an Ethereum account by installing a crypto wallet.
A crypto wallet is an application with two main roles:
Although the name might suggest it stores crypto locally, like an old conventional wallet used to store dollar bills, that is not the case. In crypto – as well as in the current digital bank system – your money is simply bytes on a database, and you need some type of credential to move them around, whether it's an ID and password in the banking system or keys in crypto rails.
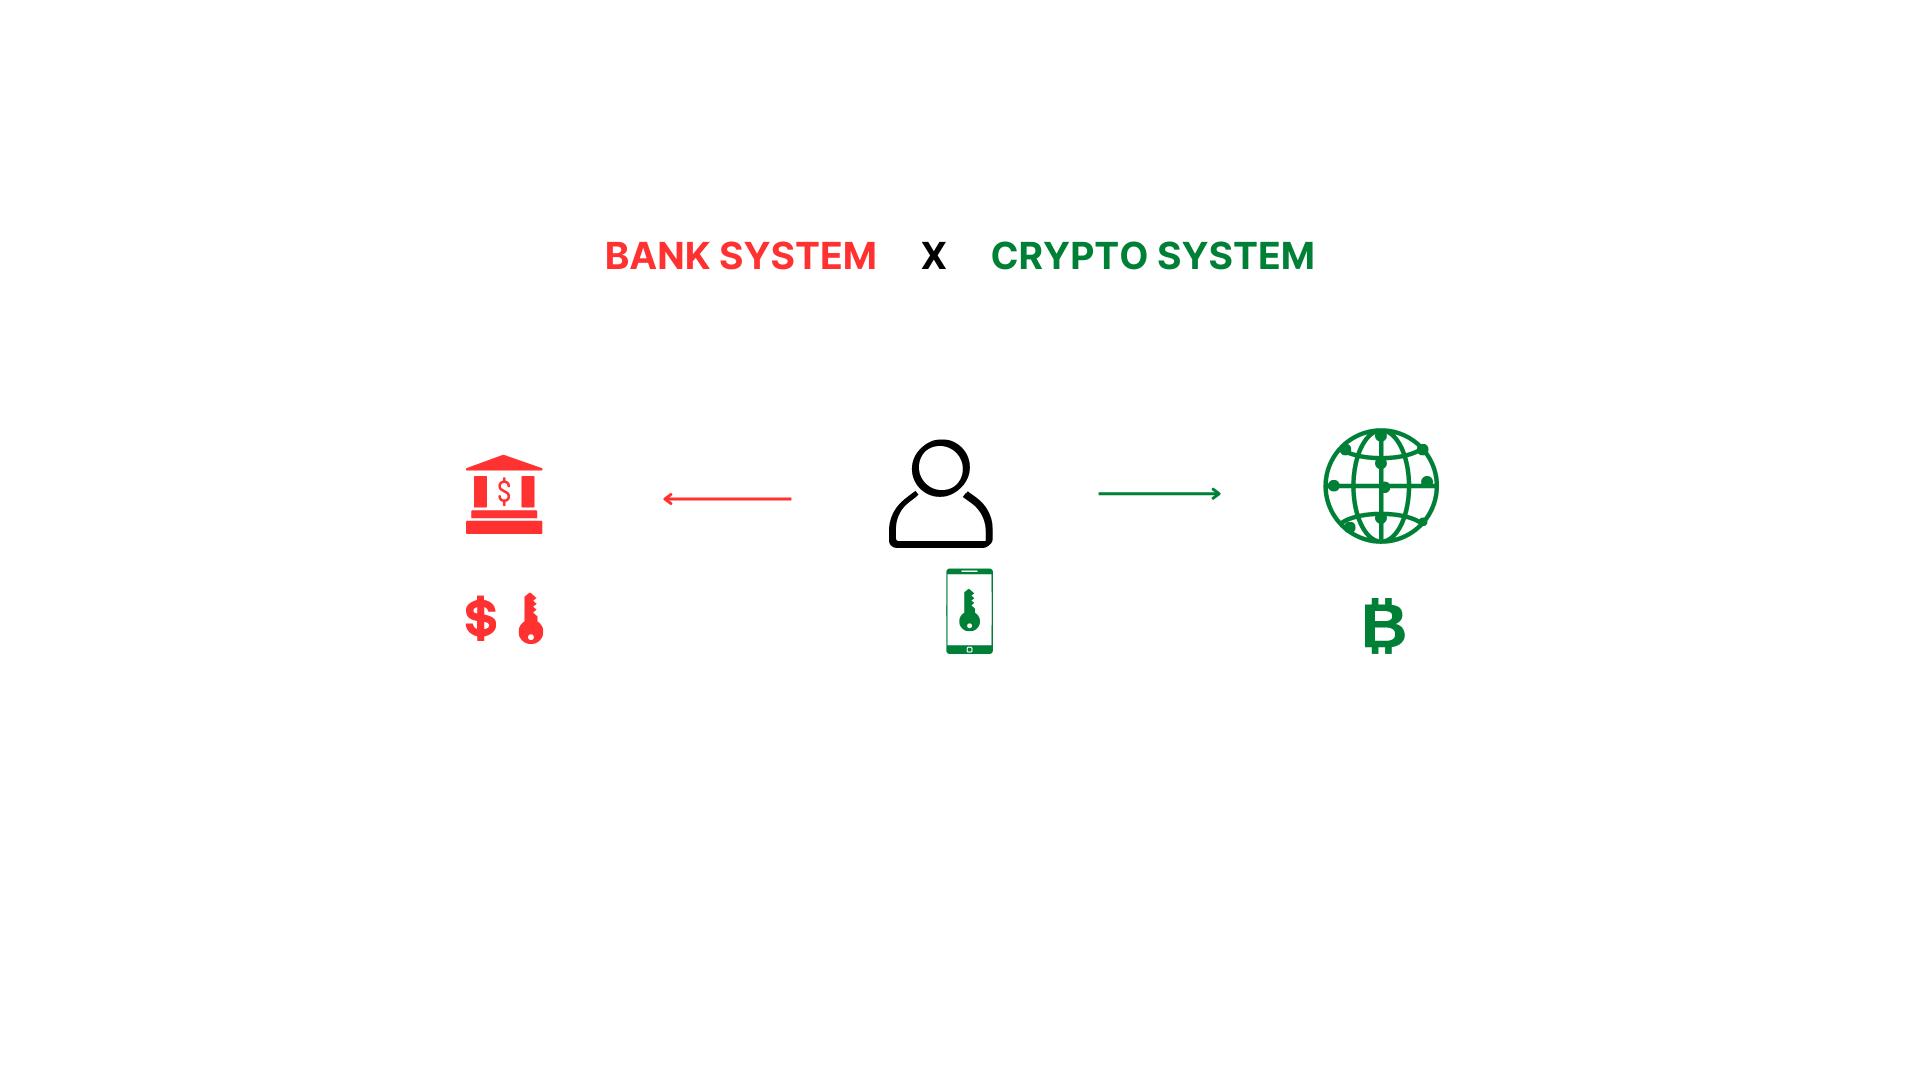
The fundamental difference between the two is that crypto keys are stored locally inside the wallet app (self-custody), while in traditional bank systems, your keys are stored on the bank’s database and managed by the bank’s administrators.
In crypto, you own your keys, and only you can transact your funds, whether it’s a cryptocurrency, a crypto token, an NFT, or your ENS address.
There are two important steps you’ll need to do before receiving your ENS name:
Some of the leading wallets used for managing crypto assets are Coinbase Wallet and MetaMask.
For this article, we will be using Coinbase Wallet. Let's see how to install it.
Before we begin, it’s important not to confuse Coinbase Exchange, where you buy and sell crypto using fiat currency (dollars), with Coinbase Wallet, used for transacting with your crypto assets. Although the same company, Coinbase, owns both, they are different solutions.

To download Coinbase Wallet, go to coinbase.com/wallet and download the Google Chrome extension, which also works on other Chromium-based browsers like Brave and Microsoft Edge.
Click on the "Download" button to be redirected to the Chrome Web Store. Click "Add to Chrome" and then on "Add Extension."
Once the installation is complete, a pop-up will appear, directing you to the Coinbase Wallet icon on the toolbar. To facilitate future use, click on the Extension List icon in the upper right corner, find the Coinbase Wallet icon, and click "Pin" to pin it to the browser bar.
Now, let's begin setting up the wallet.

First, click the Coinbase Wallet icon and select "Create a New Wallet."
What follows is the most important step in this guide, so please pay close attention.
The "Secret Phrase," or "Seed Phrase" or "Private Key," consists of twelve random words that allow you to restore access to your funds on the Blockchain in case of loss or theft.
Imagine you lost your computer, uninstalled your browser, or accidentally deleted your Coinbase Wallet app. Without the "Secret Phrase," you will lose access to your crypto assets, including your ENS address. This is the only way to access your crypto assets.
Therefore, it's critical that you keep your Secret Phrase safe and secure and never share it with anyone.
Now that you understand the importance of the Secret Phrase, click on the "eye" icon to reveal the 12 random words. Write them down on a piece of paper, and make sure to copy them exactly in the same order. Inverting the order of the words during recovery will result in the loss of your funds.
While this process is generally safe for securing your ENS address, it may not be sufficient for storing large amounts of crypto assets. In such cases, consider using a more secure custodial method.
Remember, never show your secret phrase to anyone. If someone gains access to it, he can steal all your funds, and you will never be able to recover them.
Once you have written down your secret phrase, check the box below and click "Continue" to proceed.
Now, to prove you saved the words, you need to click on the buttons matching the first and last words of your seed phrase. When finished correctly, you will be able to click on "Confirm."
And last, you need to create a password to unlock your wallet each time you use your computer. This password has no utility in the recovery process, just to locally unlock your wallet.
Congratulations; now you have a crypto wallet.
In order to buy an ENS name, you’ll need to buy some ETH — the native cryptocurrency of the Ethereum Blockchain — and then fund a wallet that you can use with the ENS purchasing app.
Here are the steps you’ll take:
Note: The entire process of acquiring an ENS and paying all fees involved to set it up, depending on ETH's current price, will be around $50-$150, depending on current ETH and gas fee prices. However, if you want a more accurate price, skip to the next step, search for the domain name, and check the estimated cost.
Click on the wallet icon, select "Add Crypto," and then choose "Add Crypto with Coinbase Pay."

Coinbase Pay integrates your wallet with the Coinbase Exchange, making the buying process much easier.
If you already have a Coinbase Exchange account, simply log in. Otherwise, click on "Create an Account," fill in your information, check the box, and then click on "Create An Account."
Access your email account and find the Coinbase message with the verification account link. Click on the button.
Next, fill in your phone number, to which an SMS confirmation code will be sent.
As soon as you receive the code on your phone, enter it.
On the bank card page, you can skip it for now.

Click on "Buy & Sell" (or another link asking to verify your account) and follow the process of sending documents. You must send a photo of your passport, driver’s license, or another ID. On the next page, you’ll need to take a selfie with your webcam.
Once your identity is approved, you need to add a payment method to your account.

Several payment methods are available, such as "Bank Account," "Credit/Debit Card," and "PayPal." Choose the one you are more comfortable with, and complete the integration.
If you have any doubts about completing the integration, check the Payment Method Page at Coinbase Help Center, which has short videos for each method.
Once you have integrated a payment method into your Coinbase Exchange wallet, let’s go back to the Coinbase Wallet and buy some ETH.
Open the wallet, click on Buy, and Add Crypto with Coinbase Pay.
A new window will open. Click on Buy New Asset, choose ETH, fill in the amount (must be around $50-$150), Preview Buy, and Confirm.
Done. Now you have funds in your Coinbase Wallet and can proceed with the ENS purchase.
Once you have a crypto wallet with funds, you are ready to buy and set up your own ENS.

The first step is to go to ens.domains and click on Go To App. Then, click on the "Connect" button located in the top left corner. A pop-up with a list of wallet options will appear. Choose "Coinbase Wallet," enter your password, and click "Connect."
Next, search for the domain name you want to purchase and check if it is available. If it is, click on it and proceed to buy it.
Once you have found an available ENS, click on it and register it.
The registration process involves two blockchain transactions, so ensure you have enough balance to cover the entire process. Also, it's essential to start the process only when you're ready to complete all the steps, which should take around 5-10 minutes. Otherwise, you'll lose the fees from the first transaction, as you'll need to start over in the future.
On the registration page, choose the registration period. Longer periods will save you future gas fees necessary for renewal. Then, click on "Request to Register."
Your wallet will open, and you'll be asked to confirm the first two required transactions. If the second transaction isn't processed within seven days of the first, you'll need to start over from step 1.
Check the value and click on "Confirm."
Wait for around one minute until step two becomes green. Then, click the "Register" button, check the transaction in the wallet, click on "Confirm," and wait until the third circle also turns green.
Congratulations; you now own your first ENS domain!
While it's not required to edit any of the following configurations for your ENS domain, you have the option to do so. However, please note that any changes will incur gas fees.
Here's an interesting customization you can make to your ENS. When you set your ENS name as primary, every app you connect with your wallet that holds the ENS will show your ENS domain as "user" instead of the address.
For example, when I connect with Uniswap, a decentralized exchange app, my profile displays "peerbase.eth" instead of the wallet address number.
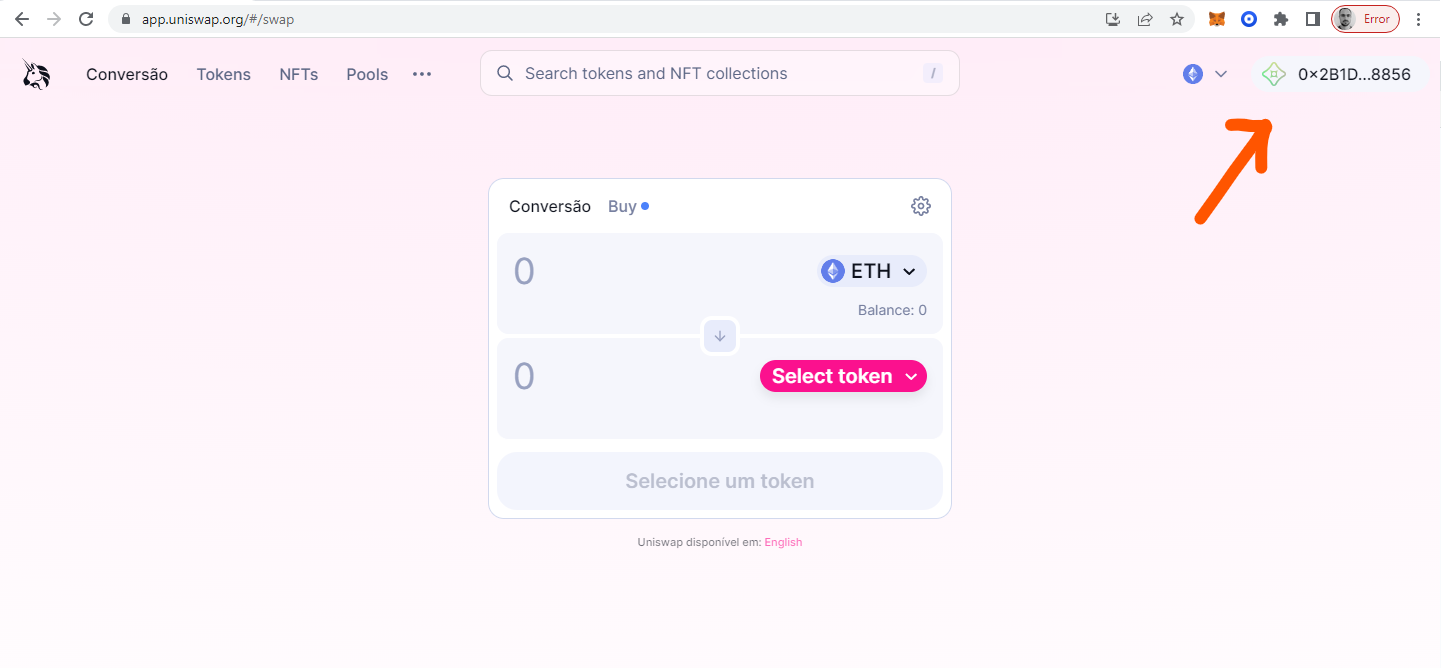
This is helpful for identification and usability in general.
To set up your ENS as primary, click on My Account in the left menu, then click on Primary ENS Name, select the domain name, and save. Again, a pop-up of your wallet will open with the transaction and the gas fee. Just confirm.

Still on "My Account" page, in the "Record" section, you can click on "Add/Edit Record" in the right top of the section to add several types of information, such as wallet addresses for Bitcoin, Litecoin, Doge, and other cryptocurrencies, as well as personal information like email, URL, avatar, and so on.
To save on gas fees, make sure to set up all the information you want to register at once.
Your ENS name is equivalent to your address. So you can give it to anyone who wants to transfer (Ethereum-compatible) crypto to you.
For example, if you need to send ETH to Vitalik Buterin, whose ENS is vitalik.eth, simply open your Coinbase wallet, click Send, add the amount to be sent, and enter vitalik.eth as the recipient. The wallet will automatically recognize the address and fill in the field.
As mentioned before, ENS is a type of non-fungible crypto asset, which means that, unlike DNS, the owner has total control over it, including buying and selling on peer-to-peer secondary markets.
If the domain name you were looking for is unavailable in the ENS app, you can still find it on some NFT marketplaces like Opensea and purchase it directly from the owner.

So, go to Opensea.io, type ENS in the search bar at the top, and click on the collection ENS: Ethereum Name Service.
Now you can search for the desired ENS name or filter the results by character set in the left menu. Some ENS names, listed with price, are available for purchase. Others are not, but you can still make an offer.
In each case, simply click on the desired ENS, check the price, and "Add to the Cart" or "Make an Offer."
If you’re a crypto enthusiast looking for a practical path to start in this revolutionary industry, understanding the concept of ENS and completing the process of setting up one is probably the best way to get started.
But that’s just the beginning. ENS can be used as a universal address and a web domain for decentralized and censorship-resistant websites. Some browsers, such as Brave, are compatible with ENS domains and can open sites deployed under ENS names, like Vitalik’s Blog at vitalik.eth.
To test this feature, open your Brave Browser, go to Settings, and search for Ethereum Name Service. Then, set Resolve ENS to Enabled. Next, type vitalik.eth in the URL bar and see Vitalik’s blog deployed on IPFS, which is a decentralized host.
But learning to do that is a subject for another article.
As we described in an earlier article, you can also use your ENS name to send and receive messages using a number of popular web3-native apps and protocols.
Finally, there’s plenty of activity in the web3 ecosystem and new applications that use ENS as universal login — the popular “ Sign in with Ethereum” effort, which continues to pick up support.
As censorship and financial repression increase globally, owning your own digital identity will be an important part of retaining your freedom to speak and transact.